
Nail Art
Super Simple Nail Art
I love nail art, I can sit and scroll through pinterest DIY’s for hours on end. The only problem is they seem to get really complicated.
I can’t do anything magical or out of this world. I have the patience, I have the tools (no I actually do have the tools!) but i’m not a nail artist. I do though, love making little easy designs and impressing my family from time to time, a little design I learnt just a few days ago is going to be the topic of today’s post.

Let’s begin!
If you’re a newbie like me you might think it’s too hard, too much waiting around but, trust me it’s actually one of the easiest nail designs I have ever done.
Step 1
You’re going to need a few things before we begin.

Clear polish/base coat, blue nail polish, white nail polish, black nail polish ,yellow nail polish and either some nail art tools or some small rounded tools. You will see why when you read on!
I got these for Christmas which comes with a ton of colors and is so handy when creating nail art like this one. You don’t necessarily need the exact colors from above, you can make any color penguin but, these were my favorite and I kinda wanted him to be blue instead of your normal black penguin.
Step 2
Apply your base coat.

This just protects your nail from the polish and as you can see from the photo, mine helps your nails grow!
Once that is dry move on to the color you want your penguin to be. I chose blue. You then just coat your nail in the color and allow that to really dry. If you don’t feel like your blue is ‘blue enough’ just go over it again and allow that to dry.

Step 3
This is the trickier bit. Taking either a manicure white tip white or a nail art brush such as this one. You just need to make an ‘n’ shape on your nail.

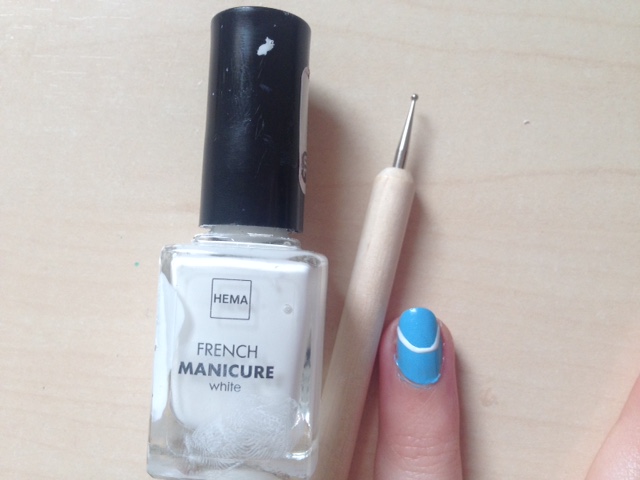
Fill that in with the white (or color of your liking) and wait for that to dry

Step 4
Before you start this step please make sure your nail is properly dry, if it isn’t applying the ‘eyes’ could smudge the belly and oh my god, you have to start again. So, just be patient!
Now we need to make the eyes. Taking a rounded shape nail art brush or any tools you can find in this shape, dip it in to your white and create two circle blobs just touching your penguins belly. And allow to dry


Step 5
Once dry, taking a small nail art pen or any small tool like the one below, dip the end in to black polish and dab on to the penguins eyes, making ‘pupils’.


Step 6
Taking a nail art brush or a small paint brush, draw an upside down triangle in the middle of your penguins ‘belly’, this is your penguins beak. Just fill it in with more of your yellow.
The reason I didn’t include the ‘brush’ in the initial ‘what you will need’ is because you could end the process here if you wanted too or you could use your dotting tool to make a small, round mouth. I like to use the brush to make the beak but, it isn’t essential!

Step 7
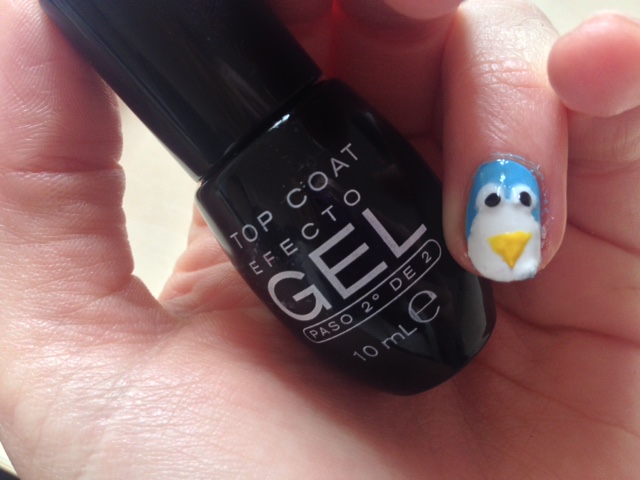
Allow your penguin to dry completely and then cover with a shiny top coat. I used a gel top coat as it just helps prevent wear and tear!

What I Used
I just thought I would show you the things I used, as it made it so much easier to do. I only just got these two things for Christmas and they have seriously made playing around with my nails super easy.

They’re super cheap and you get a ton of colors to make designs with. You can get them for an amazing price in the UK by clicking here. You can also get them for an amazing price in the US by clicking here.
Nail Art Designing Painting Dotting Detailing Pen Brushes

I just needed something that wasn’t ultra professional and expensive that did it’s job so for Christmas I got these. I am in love with them, as there is so many different variations and they just make nail design so much easier for a newbie like me!
You can get them for an amazing price in the UK by clicking here or for an amazing price in the US by clicking here.
I hope you enjoyed this post on Super Simple Nail Art if you did please let me know in the comments below!
Lauren.x

0 comments